The start of fall sure is a special time, isn’t it? Colors are changing, leaves are falling, and fancy new phones are poppin’ up practically everywhere you look.
And that’s not all, either. With the official onset of autumn now just days away, there’s never been a better time to clean up, freshen up, and make sure your own existing work spaces are perfectly primed for productivity.
Making your physical desk presentable is all on you (seriously, pal, would it kill ya to do a little dusting once in a while?), but when it comes to that virtual office in your pocket — y’know, that shiny ol’ smartphone of yours — I’m here to help.
A handful of simple-seeming steps can go an impressively long way in clearing out the virtual clutter and turning your Android phone back into the optimal work companion it oughta be. And best of all? It won’t take you more than 20 minutes to pull off.
So pop open your hood, pull on the nearest pair of oil-stained coveralls, and get ready to get your hands metaphorically dirty: It’s time to step into the garage and get your mobile device in tip-top shape for the months ahead.
Android tune-up step 1: Uninstall unnecessary apps
⏱ Time required: 2 minutes
This first step may sound silly, but believe you me, it can make a world of difference: Whether they’re apps that came preinstalled or programs you downloaded once upon a moon, there’s a decent chance you’ve got at least some unused items lurking in the mustier corners of your phone. And guess what? Those forgotten icons do more than just collect virtual dust; they actively work against your efficiency-oriented interests.
First, superfluous apps take up space — both in the physical sense of your phone’s internal storage and in the sense of clutter that makes it tougher to find what you actually need. But beyond that, abandoned apps often take a toll on a phone’s performance and stamina by needlessly eating up resources. And beyond that, they open the door to some easily avoidable privacy problems (more on those in a minute).
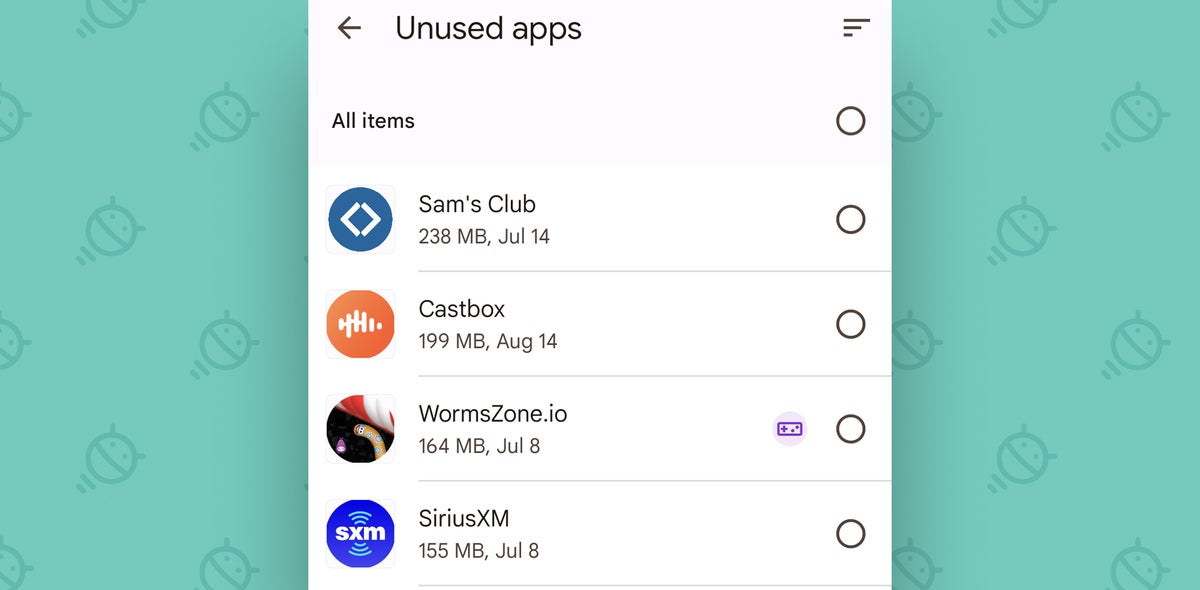
You can probably scan through your app drawer pretty quickly and figure out which programs you haven’t opened in the past month or two. If you see something you aren’t using — or something you really don’t need — touch and hold its icon and then drag it up to the “Uninstall” command at the top of your screen. Remember, you can always reinstall it later if the need ever comes up.
And if an app can’t be uninstalled, it probably came preinstalled on your device and is baked into the system courtesy of your phone’s manufacturer and/or carrier. You should still be able to disable it, though: Either long-press it and then touch the “i” icon that appears or find and tap its title within the Apps section of your system settings. Then, look for the “Disable” command, tap it with gusto, and send the thing off to app hell — where it belongs.
⭐ Bonus tip: Want a helping hand in identifying your unused apps? Grab Google’s standalone Files app (which notably may not be the same as the Files app that came preinstalled on your phone). Open it once, then set yourself a reminder to check back on it in a month. By then, Files will have built up enough data to be able to tell you which apps you aren’t actually ever using — and to give you a super-simple way to get rid of all of ’em with a few quick taps.
 JR
JRJust be sure to think through its recommendations carefully before uninstalling anything. Sometimes, the Files app will flag an app as “unused” if you haven’t explicitly opened it in a number of weeks — even if it’s something you actually do rely on as a background utility. But it’s a helpful starting point for this part of the process and a great way to get your tune-up going.
And speaking of stuff that runs in the background…
Android tune-up step 2: Lock down battery drainers and background data abusers
⏱ Time required: 5 minutes
Maybe there’s an app you genuinely do use but that drags your phone down with over-the-top background activity — in other words, doing stuff you don’t need it to do while you aren’t actively looking at it. Facebook and Instagram are both notorious for this sort of obnoxious behavior, and they’re anything but the only offenders.
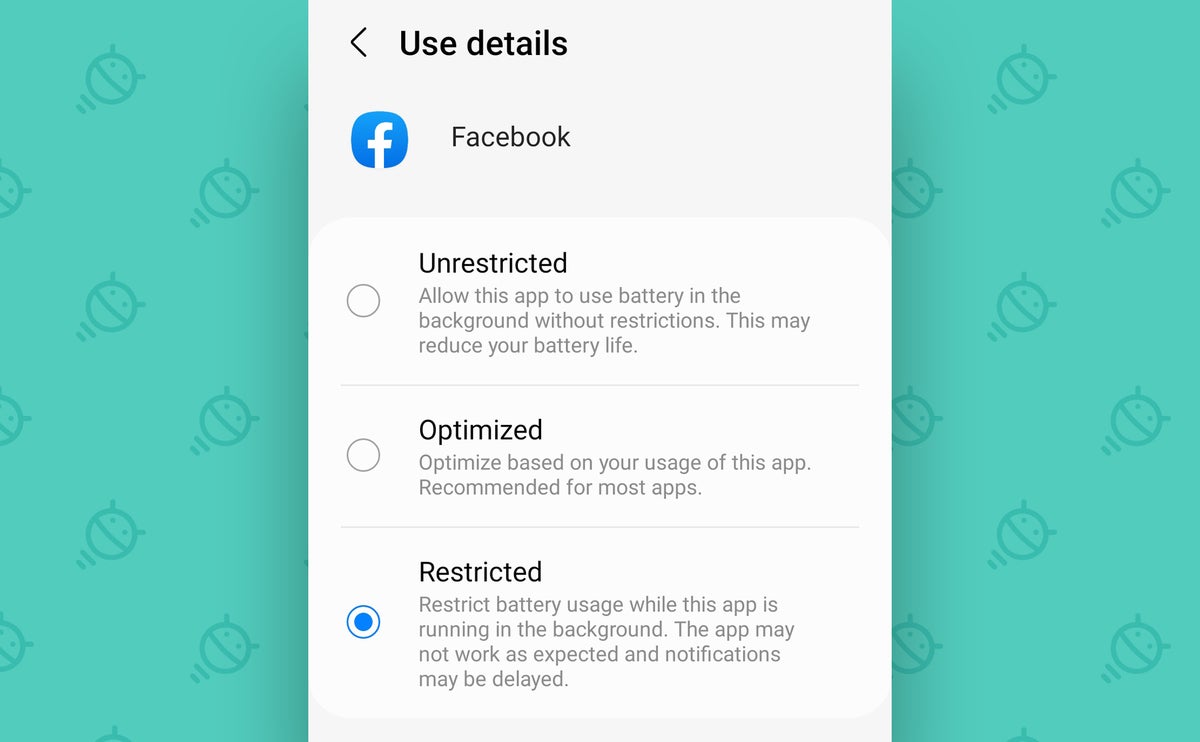
Lucky for us, though, even when an app is poorly designed in this way — with abusive background activity and no easy option to stop it — you can still reclaim control. Start by opening up the Battery section of your system settings and finding the app-by-app battery usage breakdown. (On some devices, you may have to tap the three-dot menu icon in the upper-right corner of the Battery settings to uncover that option.) This’ll work best if you do it toward the end of a day, when your phone has plenty of activity to analyze.
Tap any app with high battery usage and then see how much of its activity is happening in the background — while you aren’t actively using it. For any programs with high amounts of background activity, ask yourself: Is this app doing something in the background that actually matters? For instance, do you really need Facebook, Twitter, or other social media and news tools to be refreshing their feeds while you aren’t looking at ’em? Probably not. But lots of apps like those do that by default and end up draining your device’s battery (and sometimes even taking a toll on your phone’s performance) as a result.
For any such items you come across, you’ve got two options: Look in the app’s own settings to see if there’s a way to turn off its background activity — or, provided your phone is running 2017’s Android 8 release or higher, use Android’s own background restriction option within your phone’s Battery settings or Apps settings to shut it down at the system level.
 JR
JRLet’s check one more place, just to round things out: Head over to the Network & Internet section of your system settings (or the Connections section, if you’re on a Samsung phone) and tap the line labeled “Data usage” — or, if don’t see that line, tap either “Internet” or “Mobile network” and then tap the gear icon next to your carrier’s name followed by “App data usage.” (On some devices, you might see “App data usage” or possibly “Mobile data usage” right on that initial screen.)
However you get there, you should find a list of how much data different apps have been using as of late. Select any apps with high amounts and see how much of their data transferring is going on in the background. If an app is using a significant amount of background data for no apparent reason, take away its ability to do so by deactivating the “Background data” toggle on that same screen — which in turn will free up precious processing power and battery juice in addition to stopping the needless drain on your mobile data plan.
With both parts of this step, just be sure to use common sense and avoid disabling background permissions for any system-level tools — things like your Phone app or “Android OS” — as well as for any apps that genuinely need such capabilities in order to operate (like a messaging app, for instance, which wouldn’t be able to look for new incoming messages if it didn’t have background data and battery access).
Android tune-up step 3: Check up on app permissions
⏱ Time required: 5 minutes
It’s 2022. Do you know what data your apps have access to? (Please read that in your best booming TV announcer voice for maximum effect.)
At a time when personal data is essentially equal to money for lots of companies, you can’t be too careful with keeping tabs on which apps want which bits of your information and why. And it’s up to you to play the role of permission police — because while most reputable apps won’t ask for types of access they don’t genuinely need, you’d better believe there are apps (and, ahem, device-makers) out there looking to tap into your info for all the wrong reasons.
Take five minutes now to revisit which permissions you’ve granted to which apps on your phone and make sure they all seem sensible. First, open up the Privacy section of your system settings and tap the “Permissions manager” option. (On devices with older Android versions, the option may be labeled “App permissions” and bundled in with a broader Security section of your system settings.)
Go through each permission listed there and see what apps have been authorized to access it. Think carefully about whether every app that has access to a given area really needs access to that area — and anytime you see something that strikes you as unnecessary, pull that permission away (either by deactivating a toggle next to the app’s name or by tapping the app’s name and then changing its setting to “Don’t allow” or “Deny,” depending on your specific Android version and implementation).
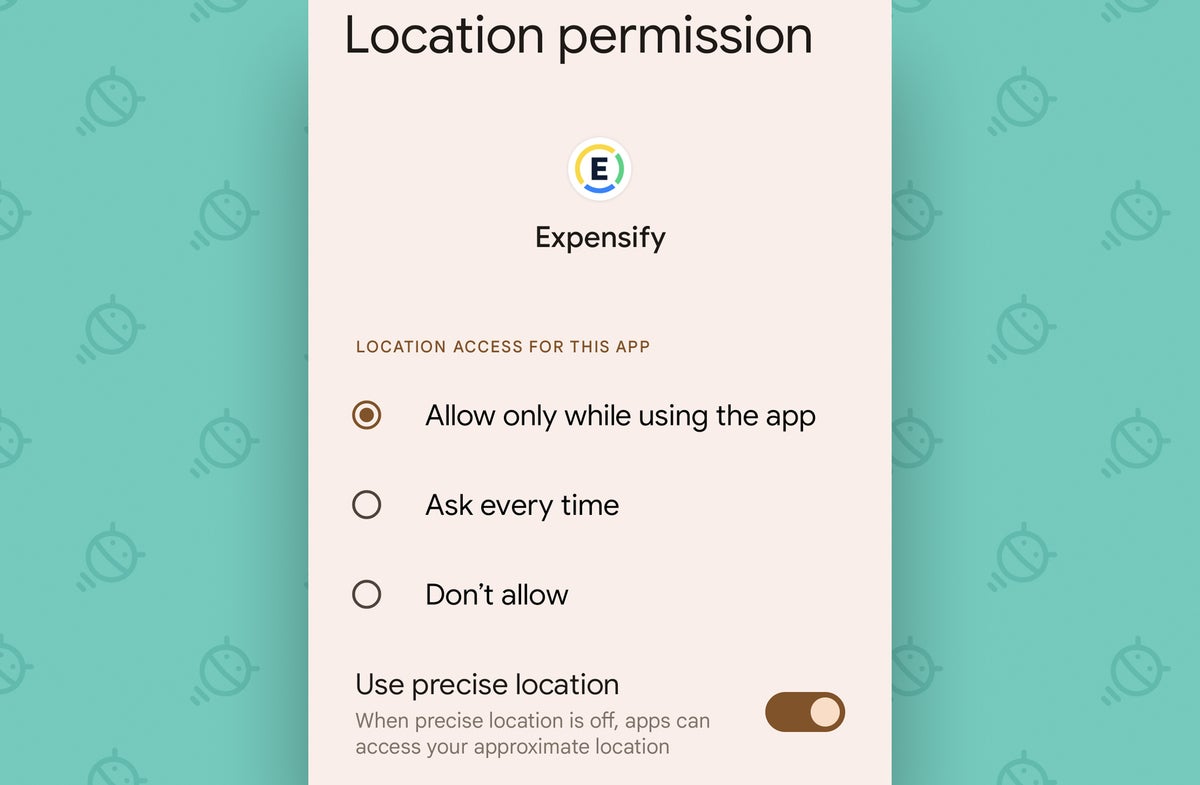
If your phone has Android 10 or higher, pay extra-close attention to the “Location” section of app permissions — as all reasonably recent Android versions give you the power to get even more nuanced and specify whether apps should have access to your location all of the time, none of the time, or only when they’re actively in use.
 JR
JRWith Android 11 and higher, that same concept is expanded with the ability to let an app access your location, camera, and microphone only once — on a limited, one-time basis. All you’ve gotta do is select the “Ask every time” option for any app within that same area of your system settings to go that route.
And starting with Android 12, you can also specify whether an app should be able to access your precise location or see only a broader, more approximate overview of your general whereabouts. Now’s the time to revisit all that stuff and mull over the smartest and most appropriate setting for every app you’ve got installed.
Android tune-up step 4: Nuke annoying notifications
⏱ Time required: 3 minutes
This next part of our tune-up is less about system performance and more about your own sanity and ability to get stuff done. Notifications are distractions, after all — and odds are, your phone’s giving you plenty of attention-demanding alerts you don’t really need.
Think about all the notifications that show up on your Android device — and then think carefully about how many of ’em provide you with truly pertinent info that warrants the interruption. Do you need to know about every breaking news story the second it happens instead of finding that info when you actively seek it out on your own? What about social media mentions or incoming emails? Only you can decide what makes sense for you, but I’d be willing to wager you have at least a couple (and more likely a coupon dozen) types of notifications you’d be better off without.
If you think of any such examples, march back to the Apps section of your system settings and tap the line to see all of your installed apps. You can then select any app you’ve got and either turn off all of its alerts, at the system level, or disable only certain types of alerts it’s able to generate — for instance, leaving on notifications for direct messages in Twitter but shutting off all the other types of interruptions that service loves to send your way.
You can also get even more nuanced and change the way certain types of alerts appear — maybe setting an app’s less important notifications to show up silently so you’ll see ’em eventually but won’t be bothered when they arrive.
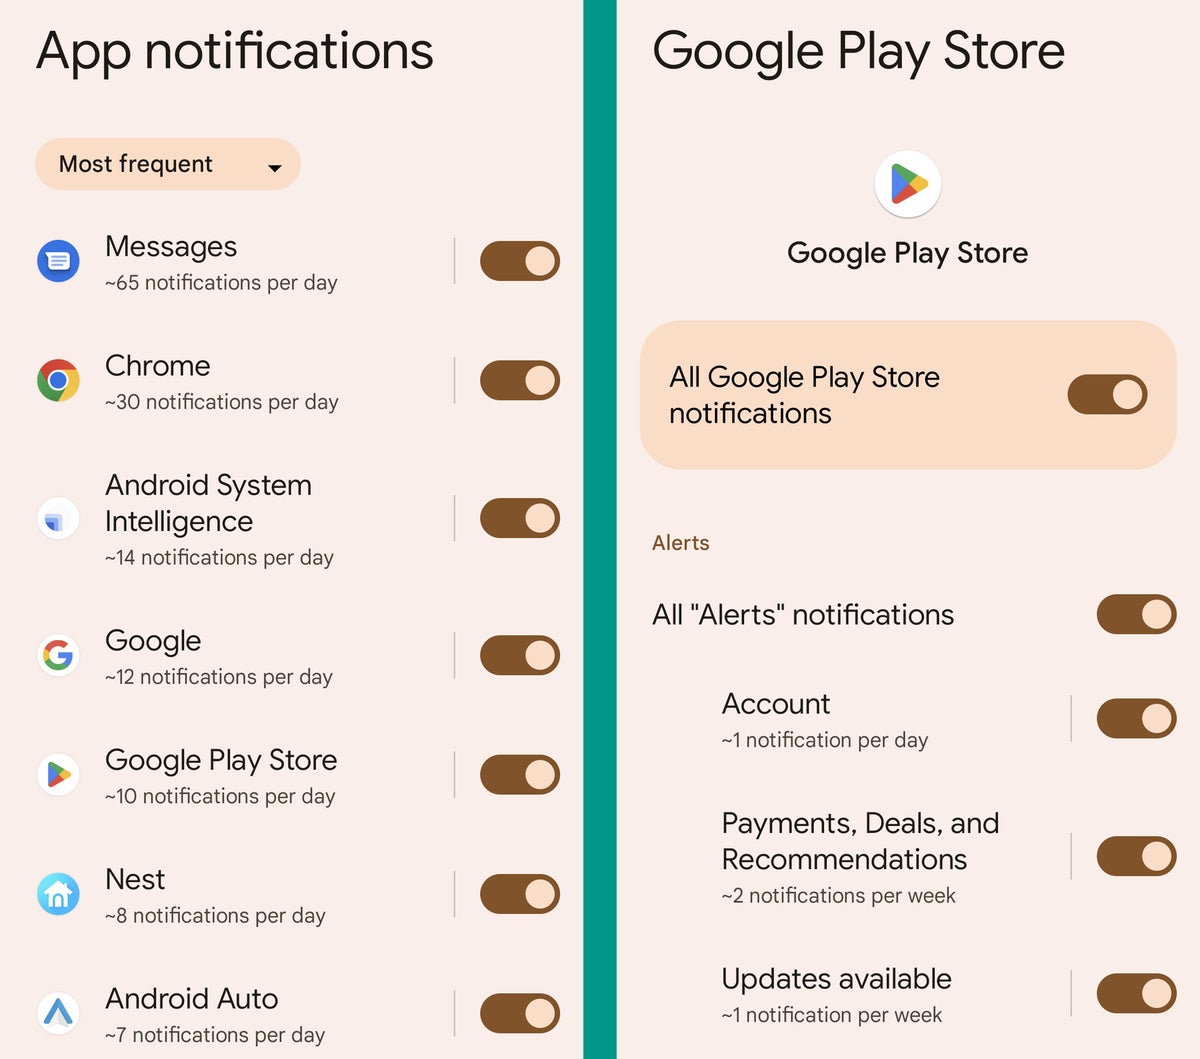
⭐ Bonus tip: Provided your phone is running Android 9 or higher, there’s a quick ‘n’ easy way to find your worst notification offenders: Head into the Notifications section of your system settings, tap “App notifications,” and then look for “Most recent” bar at the top of the screen. (On Samsung phones, you’ll instead look for the line that says “More” within the “Recently sent” area of that same Notifications settings screen.)
Tap that, then tap the selector at the top of the screen and change it from “Most recent” to “Most frequent” — and then, you’ll see an ordered list of exactly which apps are interrupting you the most. You can tap on any app’s name from that list to jump directly to its notification controls and tell it to kindly hush its virtual beak.
 JR
JRAndroid tune-up step 5: Clean up your storage
⏱ Time required: 3 minutes
Android phones often have limited amounts of local storage — especially when you’re working with an old Android device or one that’s more on the midrange to lower-end side of the spectrum. So the next step in our tune-up will clear out the cobwebs and free up some of your device’s precious local space. That’ll give you more room for future downloads and app installs, of course, but it can also help your phone run a heck of a lot more smoothly.
The biggest storage-sucking culprit, not surprisingly, tends to be content from your camera — so if you aren’t already using Google Photos’ excellent cloud-syncing capability, head into the app’s settings and set that up now. Then, you can safely erase all the local copies of your photos and videos and still access them as if they were on your device. Plus, you can get to ’em from other phones or computers, too.
The rest is easy as can be: Remember that Google Files app we were talking about a few minutes ago? Open it up and look through the cards on its main screen. They’ll show you a bunch of smart suggestions for stuff you can clean up and delete, ranging from junk files and duplicates to already backed-up photos, videos, and other files you aren’t using and likely don’t need. You can review all of the suggestions and then click a button to sweep any of the associated files away without ever leaving the app.
 JR
JR⭐ Bonus tip: If you’re using a Google-made Pixel phone, look for the “Smart Storage” option within the settings area of the Files app (which you can get to by tapping the three-line menu icon in the app’s upper-left corner and then selecting “Settings”). Activating that will allow your phone to automatically remove already-backed-up photos and videos whenever your storage is running low or after the files have been on your device for a certain amount of time — taking all the heavy lifting out of your hands and making the ongoing maintenance almost entirely effortless.
Android tune-up step 6: Spruce up your home screen
⏱ Time required: 2 minutes
Last but not least, a tune-up step that’s all about organization and efficiency: getting your home screen tidied up and in optimal working order.
An organized home screen makes it faster and easier to get to the stuff you use the most — and realistically, for most of us, that’s a relatively small number of items. Remember: This isn’t iOS! You don’t have to treat your home screen as a generically cluttered grid of every single thing you’ve got installed.
So look at every item on your home screen and think carefully about how often you use it. If it isn’t something you open at least once daily or close to it, take it off. That way, your home screen will act as an efficient launching board for your most essential apps, shortcuts, and widgets — the stuff you actually access on a regular basis — and then everything else can be pulled up quickly as needed via your scrolling alphabetical app drawer.
 JR
JR⭐ Bonus tip: If you really want to take your home screen efficiency to the next level, consider exploring the excellent Niagara Launcher home screen replacement app. It swaps out your device’s standard home screen setup for a super-minimalist approach that makes getting around your device as speedy as can be. Just be sure to give it a solid week or two to let yourself get used to it, as its unconventional philosophy often takes a bit of adjustment — but once it starts to feel second-nature, you’ll be flying around your phone like never before.
And with that, my dearest darling, your annual Android tune-up is complete. Give yourself a hearty pat on the back and grab a well-deserved donut — and get ready for your phone to roll out of the shop and rev its engine all over the world.
Ready for even more advanced Android knowledge? Come check out my free Android Shortcut Supercourse. You’ll learn tons of time-saving tricks for your phone!
Copyright © 2022 IDG Communications, Inc.


